BizTalk Server 2016: Using the XslCompiledTransform Class

By Rob Callaway

A few weeks ago, QuickLearn Training hosted a webinar with an overview of a few of the new features in BizTalk Server 2016. This post serves as a proper write-up of the feature that I shared. In this write-up, I’d like to drill a little deeper into the things that were discussed and even explore some other aspects that we simply didn’t have time for. In my portion of the webinar, I spoke about using the XslCompiledTransform class in maps. If you missed the full webinar, check it out over on the QuickLearn Training YouTube channel. If you prefer you can just watch the section on the XslCompiledTransform class.

Comparing XslCompiledTransform and XslTransform Performance

There are so many resources comparing these .NET classes against one another that I’m really not sure that there’s anything I can add to the discussion. The best of these resources is the one I cited in the webinar by Anton Lapounov. Simply put, if you put these two classes in a straight-up foot race, the XslCompiledTransform is going to take longer to load, but will blow away the XslTransform class when it comes to the actual time to transform.

Comparing XslCompiledTransform and XslTransform Behaviors

Now, if you’ve closely followed the features of other releases you may think this isn’t actually a new feature, and you would be mostly correct. You see, in BizTalk Server 2013 the mapping engine was changed to utilize the XslCompiledTransform class instead of the XslTransform class that the mapping engine had been using since BizTalk Server 2004. While this change was made to reap the performance benefits of the XslCompiledTransform class over the XslTransform class, it was a change that Microsoft made unilaterally to all BizTalk maps compiled for BizTalk Server 2013. While the intention was pure, this change wasn’t universally welcomed by BizTalk developers. There are several great write-ups exploring issues that arose in existing maps when updated (for example this great blog post from Dan Rosanova, or just the Known Issues for BizTalk Server 2013). In case you’re pressed for time and can’t read those, the issues arise from the differences in behavior between the XslCompiledTransform class and the XslTransform class. The specific differences are:

  • If an input XML field is empty or contains a false value, the Scripting functoid will treat the input as a true
  • The XslCompiledTransform class only supports calling public methods
  • The XslCompiledTransform class does not support returning null
  • In the XslCompiledTransform class, function overloads are differentiated by number of parameters rather than types
  • The XslCompiledTransform class utilizes the XPathArrayIterator type rather than the XPathSelectionIterator type for looping through repeating records within the Scripting Your script must call the MoveNext() method to advance properly

While these five changes may seem relatively trivial, for some people they presented issues that completely broke their maps. There is a registry setting which allows you to tell the mapping engine to use the XslTransform class, but the change is applied globally to all maps and negates the potential performance gains offered by the XslCompiledTransform.

Setting the Transform Class for a Map

BizTalk Server 2016 now surfaces the option for the transformation class as a UI element. Furthermore, the transformation class isn’t specified globally, but instead we can set it for each map separately. So, any maps I’m upgrading that are negatively affected by the XslCompiledTransform class can target the XslTransform class. This ability to opt-in or opt-out gives us true backward compatibility that was sorely missing in the previous releases.

By default, any new or existing maps that you are upgrading will target the XslTransform class (for backward compatibility), but setting the transform class for the map couldn’t be easier. In your map, if you go to the Properties for the map grid, you will see a new property named Use XSL Transform (the default is True and indicates that the XslTransform class will be used). If you change it to False, the XslCompiledTransform is targeted instead. There is a third option for the property, Undefined. If you choose this option, that map will check the same registry settings used in earlier releases to control the transformation class.

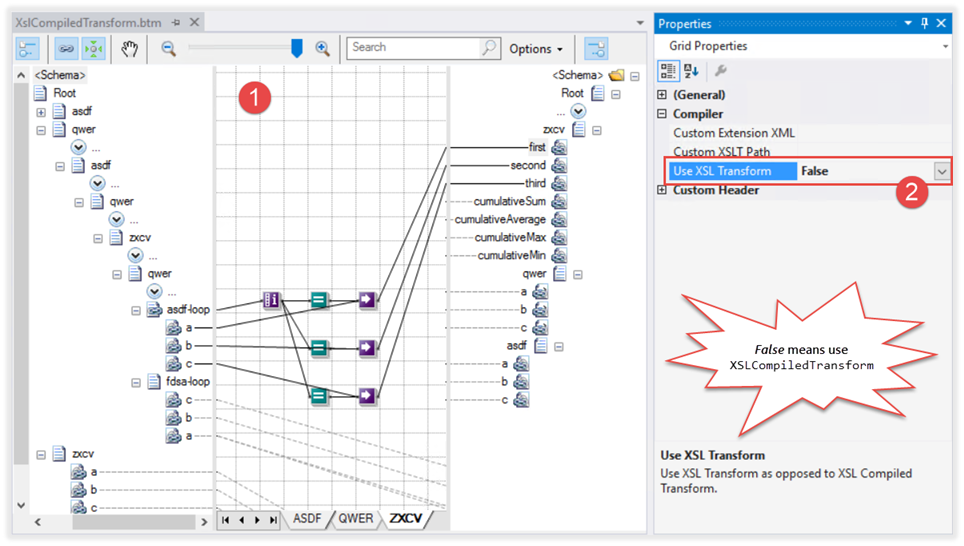
Configuring the Use XSL Transform property

Answering an Unanswered Question

I don’t really want to rehash my test process or results, as you can watch the webinar or download the slides to get all of that. Instead, I wanted to answer a question that was posed in the webinar that I was unprepared to answer. Niyati asked if the increase in performance would have been the same if I were calling the map in an orchestration. This configuration was not part of my initial round of tests, but I cracked open my solution, and created an orchestration so I could definitively show whether it was true or not.

My orchestration has the simplest design possible. It receives the message, runs the map, and sends the transformed message out.

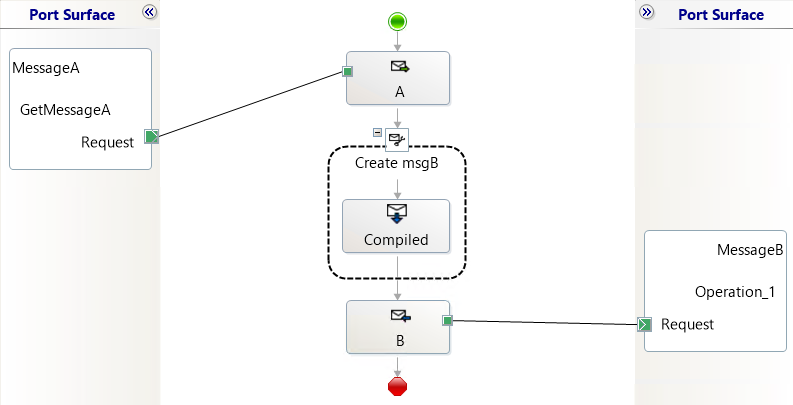
Orchestration used to test the XslCompiledTransform map

I made one of these babies that runs the XslCompiledTransform map, and another that runs the XslTransform map.

I went crazy in my testing and processed 10,000 instances of each orchestration using my batch file submission method. I’m not going to write a full-blown analysis of the results because I think the numbers speak for themselves.

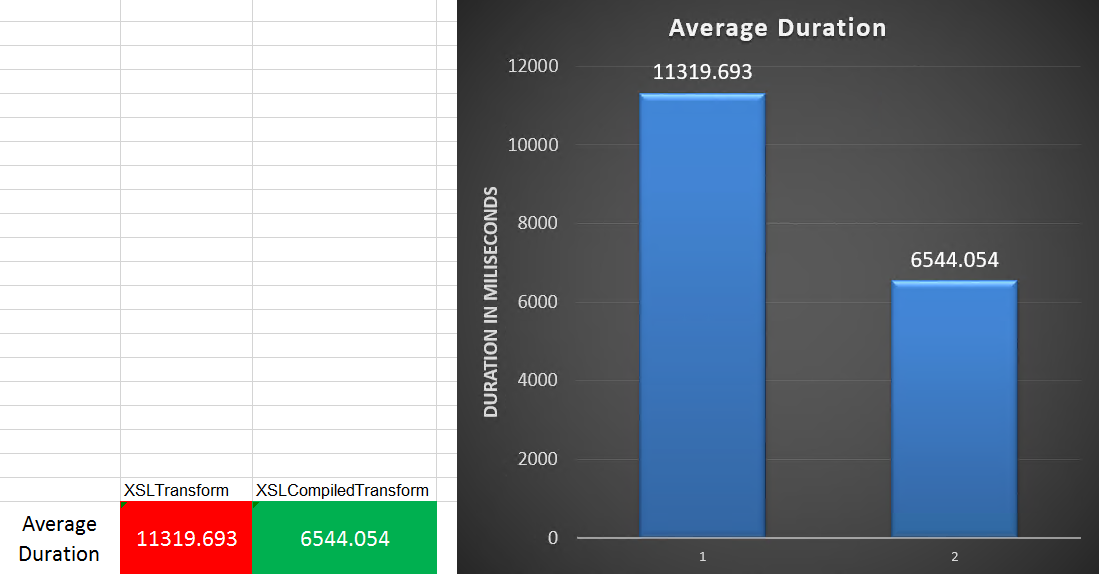
The XslCompiledTransform class once again executed much faster

But That’s Not All

I had a lot of fun exploring transformation classes in preparation for this webinar and I really look forward to the next one. Please be on the lookout for details on that webinar in the coming weeks.

If you need to learn more about measuring and analyzing BizTalk Server performance, tuning performance, or controlling the throttling behaviors in BizTalk Server you really should check out our BizTalk Server Administrator Deep Dive course.

BizTalk Server 2016 New Features: Shared Access Signature Support for Relay Adapters

By Nick Hauenstein

At the end of last week, a few of us from QuickLearn Training hosted a webinar with an overview of a few of the new features in BizTalk Server 2016. This post serves as a proper write-up of the feature that I shared and demonstrated – Shared Access Signature Support for Relay Adapters. If you missed it, we’ve made the full recording available on YouTube here. We’ve also clipped out just the section on Shared Access Signature Support for Relay Adapters over here – which might be good to watch before reading through this post.

While that feature is not the most flashy or even the most prominent on the What’s New in BizTalk Server 2016 page within the MSDN documentation, it should come as a nice relief for developers who want to host a service in BizTalk Server while exposing it to consumers in the cloud — with the least amount of overhead possible.

Shared Access Signature (SAS) Support for Relay Adapters

Configuring SAS Security for the WCF-BasicHttpRelay Adapter

You can now use SAS authentication with the following adapters:

  • WCF-BasicHttpRelay
  • WCF-NetTcpRelay
  • WCF-BasicHttp*
  • WCF-WebHttp*

* = SAS for these adapters is used only when sending messages as a client (the adapters can still be used as receive adapters, just not to host Azure Relay enabled endpoints)

Why Use SAS Instead of ACS?

Before BizTalk Server 2016, our only security option for the BasicHttpRelay and NetTcpRelay adapters was the Microsoft Azure Access Control Service (ACS).

One of the main scenarios that the Access Control Service was designed for was Federated Identity. For simpler scenarios, wherein I don’t need claims mapping, or even the concept of a user, using ACS adds potentially unnecessary overhead to (1) the deployed resources (inasmuch as you must setup an ACS namespace alongside the resources you’re securing), and (2) the runtime communications.

Shared Access Signatures were designed more for fine-grained and time-limited authority delegation over resources. The holder of a key could sign and distribute small string-based tokens that define a resource a client could access and timeframe within which they were allowed to access the resource.

image

Hosting a Relay Secured by Shared Access Signatures

In order to expose a BizTalk hosted service in the cloud via Azure Relay, you must first create a namespace for the relay – a place for the cloud endpoint to be hosted. It’s at the namespace level that you can generate keys used for signing SAS tokens that allow BizTalk server to host a new relay, and tokens that allow clients to send messages to any of that namespace’s relays.

The generated keys are associated with policies that have certain associated claims / rights that each is allowed to delegate.

Shared Access Policies for the Azure Relay Namespace

In the example above, using the key associated with the biztalkhost policy, I would be able to sign tokens that allow applications to listen at a relay endpoint within the namespace, but I would not be able to sign tokens allowing applications to Send messages to the same relays.

Clicking a policy reveals its keys. Each policy has 2 keys that can be independently refreshed, allowing you to roll over to new keys while giving a grace period in which the older keys are still valid.

Shared Access Policy Keys

Either one of these keys can be provided in the BizTalk Server WCF-BasicHttpRelay adapter configuration to host a new relay.

Configuring the Security Settings for the WCF-BasicHttpRelay Adapter

When configuring the WCF-BasicHttpRelay adapter, rather than providing a pre-signed token with a pre-determined expiration date, you provide the key directly. The adapter can then sign its own tokens that will be used to authorize access to the Relay namespace and listen for incoming connections. This is configured on the Security tab of the adapter properties.

WCF-BasicHttpRelay Shared Access Signature Configuration

If you would like to require clients to authenticate with the relay before they’re allowed to send messages, you can set the Relay client authentication type to RelayAccessToken:

Enabling client authentication for relay endpoints

From there it’s a matter of choosing your service endpoint, and then you’re on your way to a functioning Relay:

Relay endpoint

Once you Enable the Receive Location, you should be able to see a new WCF Relay with the same name appear in the Azure Portal for your Relay namespace. If not, check your configuration and try again.

image

Most importantly, your clients can update their endpoint addresses to call your new service in the cloud.

The Larger Picture: BizTalk Hybrid Cloud APIs

The Larger Picture: BizTalk Hybrid Cloud APIs

One thing to note about this setup, however, is that the WCF-BasicHttpRelay adapter is actually not running in the Isolated Host. In other words, rather than running as part of a site in IIS, it’s running in-process within the BizTalk Server Host Instance itself. While that provides far less complexity, it also sacrifices the ability to run the request through additional processing before it hits BizTalk Server (e.g., rate limiting, blacklisting, caching, URL rewriting, etc…). If I were hosting the service on-premises I would have this ability right out of the box. So what would I do in the cloud?

Using API Management with BizTalk Server

In the cloud, we have the ability to layer on other Azure services beyond just using the Azure Relay capability. One such service that might solve our dilemma described in the previous section would be Azure API Management.

Rather than having our clients call the relay directly (and thus having all message processing done by BizTalk Server), we can provide API Management itself a token to access to our BizTalk Hosted service. The end users of the service wouldn’t know the relay address directly, or have the required credentials to access it. Instead they would direct all of their calls to an endpoint in API Management.

image

API Management, like IIS, and like BizTalk Server, provide robust and customizable request and response pipelines. In the case of API Management, the definitions of what happens in these pipelines are called “policies.” There are both inbound policies and outbound policies. These policies can be configured for a whole service at a time, and/or only for specific operations. They enable patterns like translation, transformation, caching, and rewriting.

In my case, I’ve designed a quick and dirty policy that replaces the headers of an inbound message so that it goes from being a simple GET request to being a POST request with a SOAP message body. It enables caching, and at a base level implements rate-limiting for inbound requests. On the outbound side it translates the SOAP response to a JSON payload — effectively exposing our on-premises BizTalk Server hosted SOAP service as a cloud-accessible RESTful API.

So what does it look like in action? Below, you can see the submission of a request from the client’s perspective:

BizTalk API from the client's perspective

How does BizTalk Server see the input message? It sees something like this (note that the adapter has stripped away the SOAP envelope at this point in processing):

Request message from BizTalk Server

What about on the outbound side? What did BizTalk Server send back through the relay? It sent an XML message resembling the following:

Response message from BizTalk Server

If you’re really keen to dig into the technical details of the policy configuration that made this possible, they’re all here in their terrifying glory (click to open in a new window, and read slowly from top to bottom):

API Management REST to SOAP policy definition

The token was generated with a quick and dirty purpose-built simple console app (the best kind).

Tips, Tricks, and Stumbling Blocks

Within the API Management policy shown above, you may have noticed the CDATA sections. This is mandatory where used. You’ll end up with some sad results if you don’t remember to escape any XML input you have, or the security token itself which includes unescaped XML entities.

Another interesting thing with the policy above is that the WCF-BasicHttpRelay adapter might choke while creating a BizTalk message out of the SOAP message constructed via the policy above (which includes heaps of whitespace so as to be human readable), failing with the following message The adapter WCF-BasicHttpRelay raised an error message. Details “System.InvalidOperationException: Text cannot be written outside the root element.

This can be fixed quite easily by adjusting the adapter properties so that they’re looking for the message body with the expression set to “*”.

image

Questions and Final Thoughts

During the webinar the following questions came up:

  • One audience member asked, “Is https supported?”
    • A: Yes, for both the relay itself and the API management endpoint.
  • Another audience member inquired, “Maximum size is 256KB; I was able to get a response about 800 KB; Is that because BizTalk and Azure apply the compression technology and after compression the 800KB response shrinks to about 56KB?”
    • A: The size limit mentioned applies to brokered messages within Service Bus (i.e., those you would receive using the SB-Messaging adapter). Azure Relay is a separate service that is not storing the message for any period of time – messages are streamed to the service host. Which means if BizTalk Server disconnects, the communication is terminated, but on the plus side you’re not having to worry about how much space you’re allowed to use per message in the cloud. There’s a nice article comparing the two communication styles over here.

I hope this has been both helpful and informative. Be sure to keep watching for more of QuickLearn Training’s coverage of New Features in BizTalk Server 2016, and our upcoming BizTalk Server 2016 training courses.