This blog post serves as a quick recap of and expansion on my October 19th Integration Monday talk titled Building Push Triggers for Logic Apps. You can view the session and look through the slides over at integrationusergroup.com.

In the talk, I explored the bare minimum requirements for building push triggers, expanding on my AzureCon 2015 talk about a specific push trigger for dealing with NFC tag reads. I showed how you could use the QuickLearn Push Trigger Tools and QuickLearn Push Trigger Client Tools to implement a simple interface for storing callbacks, and build a re-usable set of callback storage mechanisms.
I also introduced the Push-Button Push Trigger. A push trigger that responds to a button press on a Windows 10 IoT device (in this case a Raspberry PI 2), relying on Azure Storage for callback storage. In the remainder of this post, I’m going to show you how to get your own Push-Button Push Trigger up and running.
Where Do I Get a Push-Button Push Trigger?
At the moment, there are 2 ways that you can get one. You can come out to QuickLearn’s 5-day Cloud-Based Integration using Azure App Service course (or attend remotely), or you can build one for yourself!

Even if you’ve never worked with anything like this before — don’t panic. You can’t really get something simpler than this.
Essentially you’ll need a Windows 10 IoT device (Raspberry Pi 2, DragonBoard 410C, MinnowBoard Max, etc…), a momentary switch (button), some wiring to wire the button up to a GPIO port and ground, and optionally a breadboard for even more fun later. I went with a Raspberry Pi 2 for mine, but if I could do it again, I would have chosen a DragonBoard 410C given its built-in Wi-Fi capabilities that don’t require an additional accessory or external module.
To get started with developing, you will need some software on your own machine (Visual Studio, Windows 10 IoT Project Templates, etc…) and you will need to get Windows 10 IoT Core onto your device. Microsoft has provided a pretty decent write-up of that part of the procedure over here.
Assembling Your PusH-Button Push Trigger
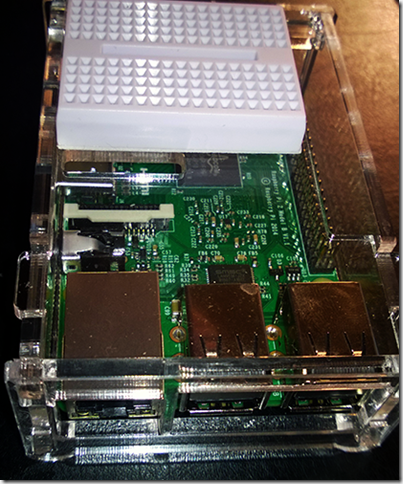
You may or may not have a case to go along with your Push-Button Push Trigger. I ended up buying the cheapest case I could find on the internet. This was likely a poor choice as it quickly disintegrated and pieces chipped off. Since then, I’ve had a lot better luck with this one. Of course, you could always print/build your own custom enclosure as well.

First things first, make sure your device has Windows IoT by inserting a prepared MicroSD card into the device.

Next, place your device in its case (if applicable). Mine has a mini-breadboard mounted on top for easier portability of the device.

Now, on to the wiring. We’re going to wire up a wire to GPIO pin 4 (chosen randomly), and another wire up to ground. Eventually we’re going to put a momentary switch inbetween so that we can quickly toggle that connection between high/low.

Let’s get that switch up on the breadboard (and make sure we put on a nice and colorful cover).
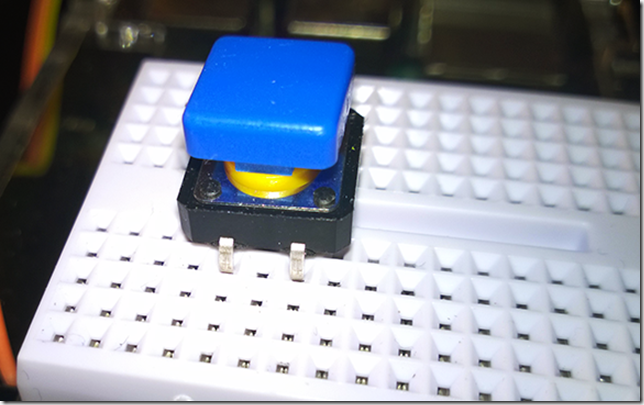
You can see in the image above how the posts are reaching down into the board. To connect wires to those pins, you will simply plug in one of the jumper wires to the same row as one of the pins.

One connection down, one to go.

At this point, everything is wired up, and it’s time to get power and internet to the device.

How Do I Make The Sample Code Work?
First of all, you can find the sample code over at https://github.com/nihaue/PushButtonPushTrigger. You can either download it as a ZIP file if you’re not comfortable with Git, or if you are comfortable with Git, you can clone it directly from here: https://github.com/nihaue/PushButtonPushTrigger.git
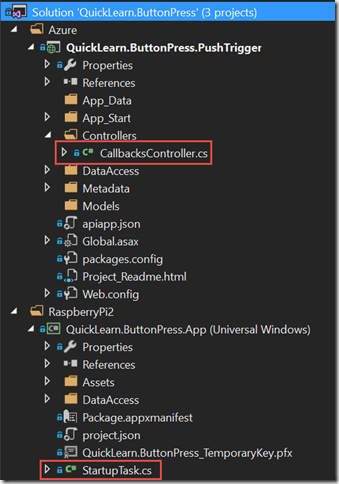
Once you have the sample downloaded, you should immediately Build the code to restore NuGet packages, and make all of the references happy. Next, you should take some time to look through the CallbacksController class for the Push Trigger (the part actually hosted in Azure with which the Logic App registers its interest in certain data), and the StartupTask class for the Universal Windows App (the part that actually looks for and handles the button press):
After you have a decent understanding of what’s going on, you’ll realize that the CallbacksController is storing callbacks from interested Logic Apps in Azure Table Storage, and the StartupTask (think background service on the device) is reading callbacks from Azure Table Storage when the button is pressed (moving this code to initialization and caching/polling for updates would be a better choice – and something you’re free to implement). So in order to get this thing working, you’re going to need an Azure Storage account.
If you don’t already have an Azure Storage account, head over to the Azure Portal and create one.

The only thing you need from this storage account will be the connection string, which you can find after it’s created over here:

With those credentials in hand, you’ll need to visit the two files in the solution responsible for storing configuration. They’re both named AzureStorageConfig.cs.

Inside that file, you will see a line of code with a TODO comment indicating that you should paste your connection string for your Azure Storage account in that location. This is indeed your next step (make sure to do it in both the code for the API App that lives in Azure, and the code for the device itself).

Ultimately, this is a terrible way to handle configuration. You can get the sample working with a simple copy/paste in that file, but the intent is that you would simply decide for yourself how you’d like to manage the configuration and creation of the CloudStorageAccount instance, and make that instance available through the StorageAccount property of the AzureStorageConfig class. This instance is used in both the AzureStorageCallbackStore and the AzureStorageClientCallbackStore classes.
Publishing the Code to Azure
We’re now ready to get this code all in place and running. The first step toward that goal will be to publish the API App project. You can do this by right-clicking the QuickLearn.ButtonPress.PushTrigger project, and then clicking Publish.

Make sure to select Microsoft Azure API Apps (Preview) as the target.

In the Microsoft Azure API Apps window, select your Azure Subscription, and then click New… Fill out the form to create a new API App container into which you can deploy your code.

Once the creation of the container is complete, you will see the following status message appear in Visual Studio.

Then, you will once again right-click the project and then click Publish… This time, the form will be pre-filled with the settings from the publish profile of the Azure API App container that you just provisioned. You might find it helpful to deploy the Debug configuration of your API App (Settings > Configuration > Debug – Any CPU), but that is entirely up to you. Once you click Publish, your code will be deployed to the API App container, and the API App will be usable within a Logic App.

Next up, we will deploy code to the device, and configure it to run in the background.
Deploy the Code to the Device
First of all, you will need to edit the project properties for the QuickLearn.ButtonPress.App project so that it attempts deployment to the correct device. In this case, that will mean navigating to the Debug tab, setting the Target device to Remote machine, the Remote machine to the name of your Windows IoT Core device (default: minwinpc), and then unchecking the Use authentication box.

You will want to make sure to save the project properties, get your device connected to the same network as your development machine (laptop in my case). Next, you can right-click QuickLearn.ButtonPress.App, and click Deploy.

Once deployment is complete, head over to the Windows IoT Core Watcher utility that ended up on your system after installing everything that you needed to get your device setup initially. If you can’t find it, reboot your system and it will be there waiting for you. The Windows IoT Core Watcher utility finds IoT Core devices on your network and provides quick links to gain access and configure them.
In the utility, right-click your device, and then click Web Browser here.

Login using your user name and password (default is Administrator / p@ssw0rd).
Next, head over to the Apps tab, and verify that QuickLearn.ButtonPress shows up in the list. You will want to note the full name as it appears here because you will need it in a few minutes.

Since this app was created as a Startup Task rather than as a graphical application, you will need to register it with the device to be run on startup. At the moment, this is not something that you can accomplish in the browser. Instead, you will need to fire up PowerShell for this next bit.
In PowerShell, you will need to enter a remote session on your device. You can do this using the Enter-PSSession cmdlet like this:

The connection process will take a while. Just get a cup of coffee, and when you have it ready, the session should be connected. Once connected, you are in PowerShell on the device, and are executing commands against the device (not your own local machine).
On the device is a utility called iotstartup. This utility provides access to configure what tasks run at device startup. In this case, you want to configure the device to constantly be running the Push-Button Push Trigger code in the background.

At the prompt, type iotstartup add headless “QuickLearn.ButtonPress.*”

Verify that what the app added matches exactly what appeared in the list on the device web page that you examined earlier. At the prompt type, shutdown /r /t 0
This will cause the device to reboot and your application to start up. It may take 60-90 seconds for the reboot to complete.
Building and Testing a Logic App using the Push-Button Push Trigger
In the Azure Portal, create a new empty Logic App in the same resource group in which you deployed the Push Button Push Trigger API App (otherwise the API App won’t be available to select in the designer). In the Logic App designer, in the API Apps pane (which you may have to expand in order to see), click QuickLearn.ButtonPress.PushTrigger.

Configure the Push Trigger as shown, and then click the green check mark to save the settings.

After the push trigger, add any other actions to your Logic App that you wish. Maybe this triggers a build in TFS, maybe it connects to a device that opens a door, maybe it brews you coffee remotely, maybe it posts a message in a chat service, maybe it closes out the latest support ticket that you were working on in your help desk system – it’s up to you. For me, I’m going to add a simple HTTP action (since it’s built into the runtime), and have it POST a message to a requestb.in indicating that the button has been pressed.

Save the Logic App, and it’s all ready to go!
PUSH THE BUTTON
There’s only one thing left to do – push the button. If everything has been setup correctly, the Logic App’s callback should be invoked and magic should happen in the cloud.

What If It Didn’t Work?
Well, there’s a few troubleshooting things you can do. Using the Cloud Explorer window (part of the Azure SDK) in Visual Studio, you can navigate to your API App, right-click and then click Attach Debugger. You can set breakpoints within the callback registration method of the controller class, and step through looking for problems as the Logic App registers the callback. This only happens when the trigger is first added to the Logic App (after clicking Save), and then every hour or so after that (assuming it worked on the first try).
You can see past registrations of the callback by navigating to the trigger history for the Logic App. If you see a string of failures there, it’s likely a bug in the callback registration code, or your storage account credentials.

Clicking any one of those line items will bring up the details (inputs/outputs) for debugging. If you want to attempt a callback registration manually (so that you can do it on demand), you can use the Swagger UI page for the API App, and manually fire the callback registration method.

The above screenshots were generated by replacing the configuration details for the Cloud Storage account with completely invalid data.
If everything looks good as far as the API App in Azure is concerned, you may want to debug the Windows IoT Core task from within Visual Studio. This can be done by right-clicking the project and then clicking Start Debugging (nothing special there).
The End
That’s all for now. Stay-tuned for more samples, and course updates!


 So how do my own custom API Apps end up in the list? Well, you can apply to have them registered in the Azure Marketplace, or you can use the Http + Swagger action in order to point to a custom API App that already exists. Of course that brings us to the question of what it looks like to actually build a custom API App in this refresh of the preview.


