One of the concerns that I have repeatedly heard from customers when we talk about Azure is application lifecycle management. If you do most of your resource deployment and management using the Azure Portal, then you probably picture a very manual migration process if you wanted to move your app from dev to test, or if you wanted to share your app with another developer.
A clear example of this occurred during a run of QuickLearn’s Cloud-Based Integration Using Azure App Service course when my students were quick to see that the Logic Apps they created was pretty much stuck where they created them. Moving from one resource group to another was impossible at the time, and exporting the Logic App (and all the API Apps it depended on) was only a dream, so the only option was to redo all your work in order to create the Logic App in another resource group or subscription.
Logic Apps and Azure App Service have come a long way since then and the QuickLearn staff has been working its collective noodle to come up with application lifecycle management guidance for Logic Apps using the tools that are available today, which will hopefully improve the way you go about deploying and managing your Logic Apps.
A Comforting ARM Around Your Shoulders
Some readers may already be aware of the Azure Resource Manager or ARM for short. For those who haven’t previously met my little friend I’ll give a short introduction of ARM and the tools that exist around it. ARM is the underlying technology that the Azure Portal uses for all its deployment and management tasks. For example, if you create any resource within a new Resource Group using the Portal it’s really ARM behind the scenes orchestrating the provisioning process.
“Great Rob, but why do I care?”
I’ll tell you why. There are tools designed around ARM that make it not only possible, but down-right easy to run ARM commands. For example, you can get the Azure PowerShell module or the Azure Command Line Interface (CLI) and script your management tasks.
There’s a little more to it though, you see, those Azure resources (Logic Apps, Resource Groups, Azure App Service plans, etc.) are complex objects. Resource Groups, for example, have dozens of configurable properties and serve as containers for other objects (e.g., Web Sites, API Apps, Logic Apps, etc.). Let’s not over simplify reality; your cloud applications aren’t made up of a single resource, but instead are many resources that work in tandem. Therefore, any deployment or management strategy needs to bear that in mind. If you want to pull back the covers on your own resources, head over to the Azure Resource Explorer and you’ll see what I’m talking about.
“It’s nice to have a command that I can run in a console window to create a Resource Group, but I need more than that!”
You’re right. You do need more than that. The way you get more is using ARM Templates. ARM Templates provide a declarative way to define deployment of resources. The ARM Template itself is a JSON file that defines the structure and configuration of one or more Azure resources.
“So how I do I get one of these templates?”
There are several ways that you can get your hands on the ARM Template that you want.
- Build it by hand – The template is a JSON file so I guess if you understand the schema of the JSON well enough you could write an ARM Template using Notepad, Kate, or Visual Studio Code. This doesn’t seem very practical to me.
- Use starter templates – The Azure SDK for Visual Studio includes an Azure Resource Group project type which includes empty templates for an array of Azure resources. These templates are actually retrieved from an online source and can be updated at any time to include the latest resources. This looks a lot more viable than using Notepad, but in the end you are still modifying a JSON file to define the resource that you want.
- Export the template – You can export existing resources into a new ARM Template file. The process varies slightly from one type of resource to the next but you essentially go to the resource in the Azure Portal and export the resource to an ARM Template file. Sadly, at the time this article is being written this is not supported for Logic Apps, but Jeff Hollan has a custom PowerShell cmdlet that he built to export a Logic App to an ARM Template file.
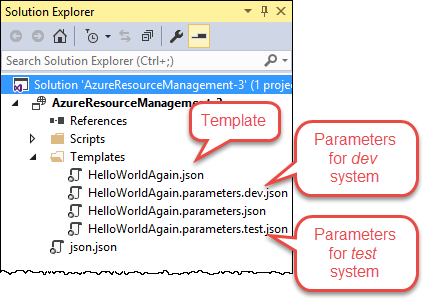
One more thing — these templates are designed to utilize parameter files, so any aspect of the resource you’re deploying could be set at deploy-time via a parameter in a parameter file. For example, the pricing tier utilized by your App Service plan might be Free in your development environment and Standard in your test environment. The obvious approach is to create a different parameter file for each environment or configuration you want to use.
“I see what you did there… So now what?”
Well, now you’ve got your template and a way to represent the differences in environments as your application flows through the release pipeline, and you have an easy and repeatable way to deploy your resources wherever and whenever you want. The only piece that’s missing are the tools to perform the deployment.
As mentioned above, you could use the Azure PowerShell tools or Azure CLI to create scripts that you manually execute. Those Visual Studio ARM Template projects even include a pre-built PowerShell script that you could execute.
Personally, I love automation but I’ve never been a big fan of asking a person to manually run a random script and feed it some random files. I want something that’s more streamlined. I want something that is simultaneously:
- Automated – The process once triggered should not require manual help or intervention
- Controlled – The process should accommodate appropriate approvals along the way if needed
- Consistent and Repeatable – The process should not vary with each execution; it should have predictable outcomes based on the same inputs
- Transparent – The whole team should have visibility into the deployments that have taken place, and be able to identify which versions of the code live where, and why (i.e., I should have work item-level traceability)
- Versioned – Changes within the process and/or the process inputs (i.e., Logic App code) should be documented and discoverable
- Scalable – It should be just as easy to deploy 20 things as it is to deploy 1 thing.
What’s Team Build?
For the past few years my team has been using TFS / VSTS as our primary source control and project management tool. In that time we’ve become more reliant on the excellent build system (Team Foundation Build) that TFS offers.
Team Build is much more than a traditional local build using Visual Studio. Team Builds run on a build server (i.e., not on your local computer) and are defined using a Build Definition. The Build Definition is a declarative definition of both the process that the build server will execute, as well as the settings regarding how the build is triggered, and how it will execute. It’s essentially a workflow for preparing your application for deployment.
The Build Definition is made up of tasks. Each task performs a specific step required in the build process. For example, the Visual Studio Build task is used to compile .NET projects within Visual Studio Solutions, and within the step you can control the Platform (Win32, x86, x64, etc.), and the Configuration (debug or release). While the Xamarin.Android task is used for compiling Android applications with settings appropriate for them.
Build Definitions can have Tasks that do more than compile your code. You might include tasks to run scripts, copy files to the build server, execute tests (Load Tests, Web Performance Tests, Unit Tests, Coded UI tests etc.), or create installation packages (though this would generally just be done through another project in your solution [e.g., with Flexera InstallShield and/or the WiX Toolset]). This gives you the power to quickly and automatically execute the tasks that are appropriate for your application.
Furthermore, a single Team Project in TFS could have multiple build definitions associated with it; because sometimes you want the build to simply compile, but other times you want to burn down the village, compile, run tests, and then deploy your web site to Azure for manual testing. Or perhaps you’re managing builds for multiple feature branches or even multiple applications within the Team Project.
“So what does this have to do with Logic Apps?”
If I add one of those ARM Template Visual Studio projects to my TFS / VSTS source control repository (whether it’s a Git repository or TFVC), I can create a Build Definition that compiles the ARM Deployment Project and other Visual Studio projects that include resources used by my cloud application (e.g., custom API Apps, Web Sites, etc.), and then publishes the ARM Template files (templates and parameter files) to a shared location where they can be accessed by automated deployment processes.
This was surprisingly easy to set up, I think it only took about 5 minutes. The best part is I can have this build trigger on check-in, so my deployment files are always up-to-date.
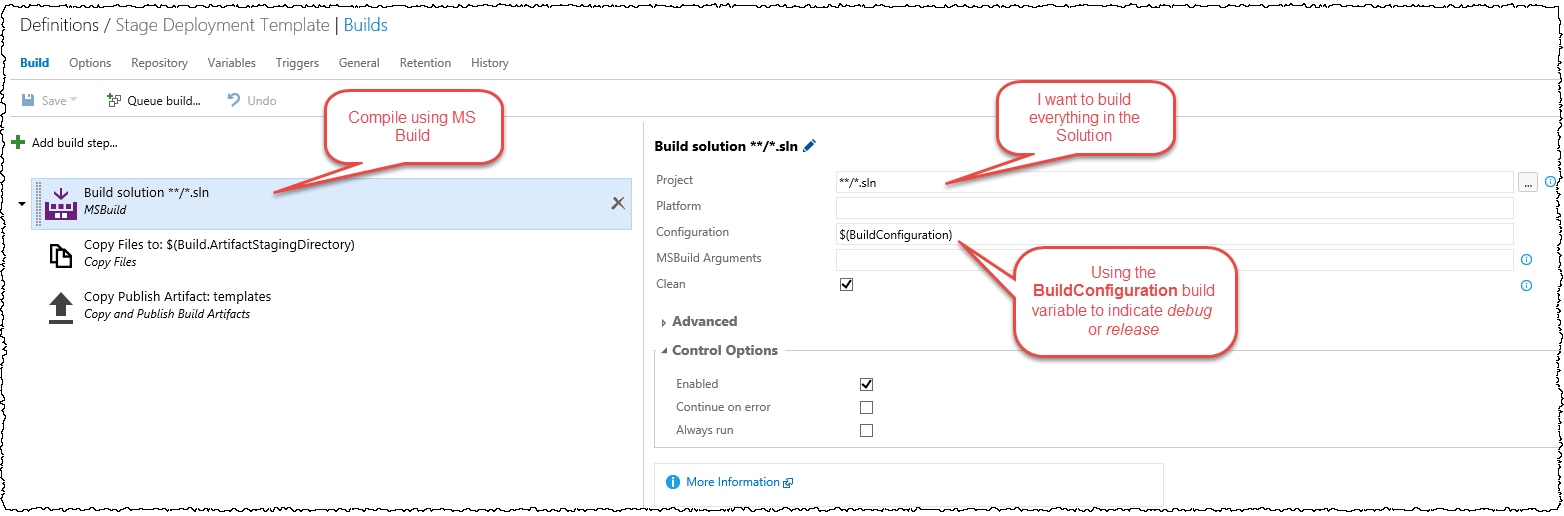
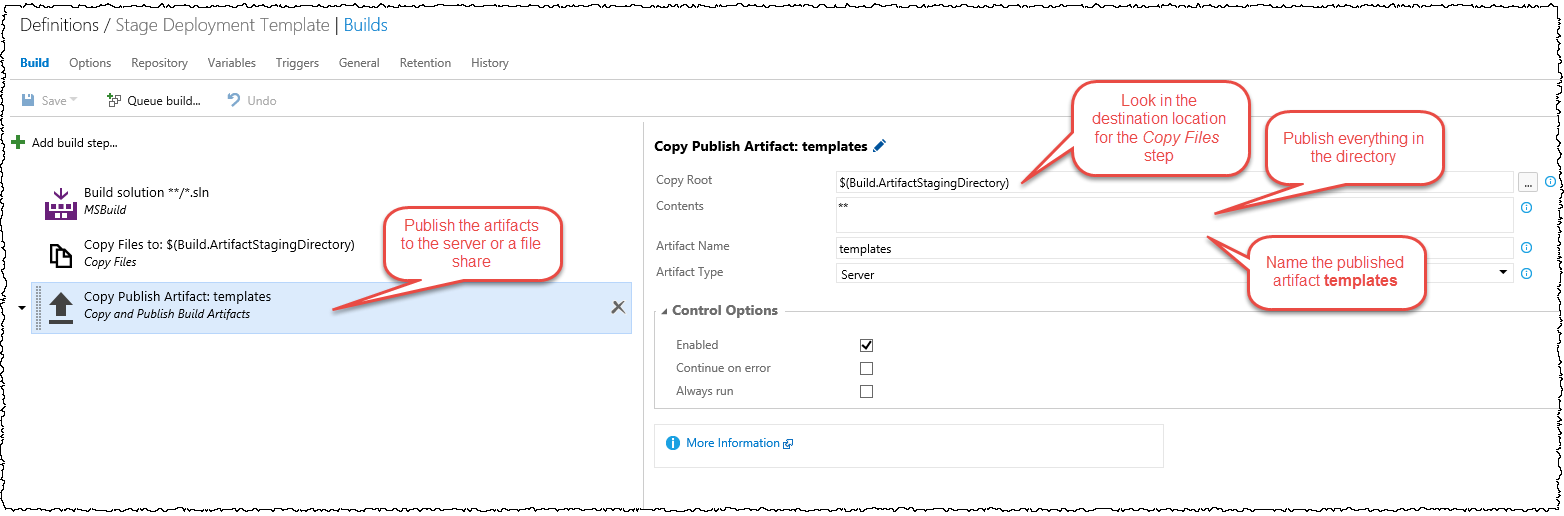
Here’s what my Build Definition looks like:
First I compile the project.
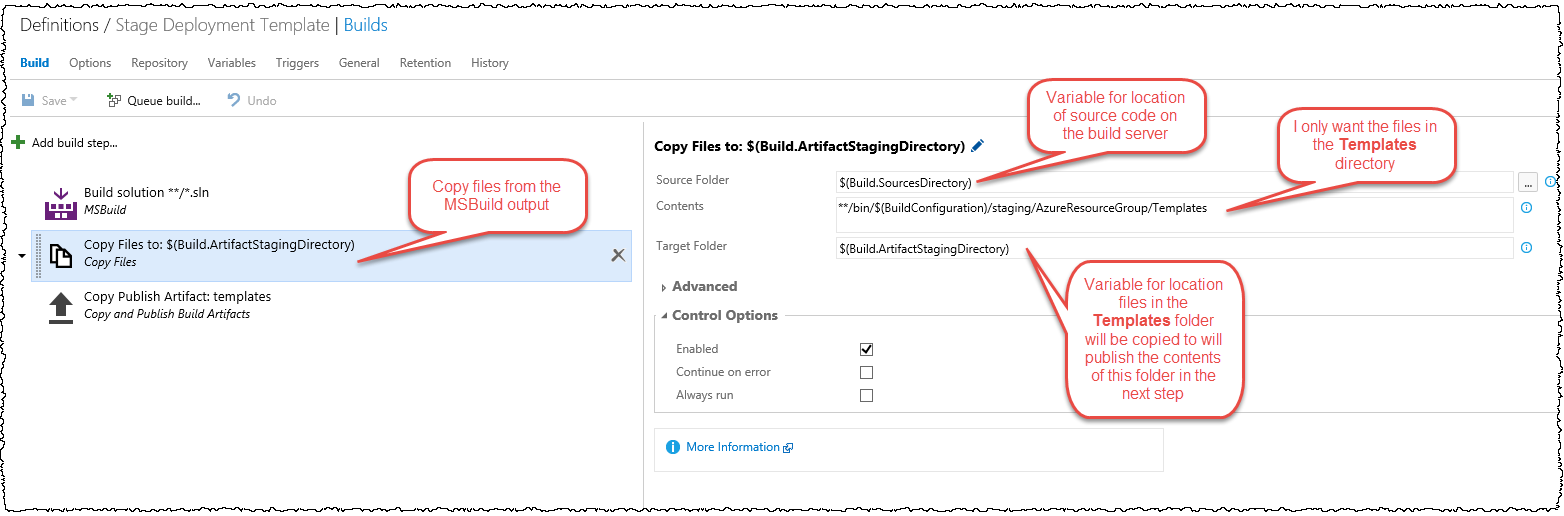
Then I copy the ARM Template files and parameter files from the build output directory to a temporary file location.
Finally, I publish the files from the temporary location. I’m using a Server location that other steps in the build (or a Release Manager release task) could use. It could have also been a file share to give access to processes not hosted in TFS.
“So what does all this add up to?”
Whenever someone changes the ARM Deployment project (whether modifying the template or parameters file or adding a new template/parameter file to it) Team Build runs my Build Definition to: (1) compile my project, (2) extract the ARM deployment files from the build directory, and (3) publish the files as an Artifact named templates. That Artifact lives on the build server and can be accessed by VSTS Release Management release tasks that will actually deploy my Azure resources to the cloud.
What’s Release Management?
Release Management (a component of TFS / VSTS) helps you automate the deployment and testing of your software in multiple environments. You can either fully automate the delivery of your software all the way to production, or set up semi-automated processes with approvals and on-demand deployments.
In Release Management, you create Release Definitions that are conceptually similar to build definitions. A Release Definition is a declarative definition of the deployment process. Just like a Build Definition, a Release Definition is composed of tasks and each task provides a deployment step. The primary input for a Release Definition is one or more Artifacts created by your Build(s).
Release Definitions add a couple extra layers of complexity. One of those layers is the Environment. We all know that release pipelines are made up of multiple environments, and often each environment will come with its own unique requirements and/or configuration details. Within a single release definition you can create as many environments as you want, and then configure the Tasks within a given environment as appropriate for that system. The various Environments in you Release Definition can have similar or different Tasks

Each environment can also utilize variables if you’d prefer to avoid hard-coding things that are subject to change.

In this simple example, I created a Release Definition with two environments: Development and Test. Within each environment I used the Azure Resource Group Deployment task to deploy my Logic App, Service Plan, and Resource Group as defined in my ARM Deployment Template JSON file.
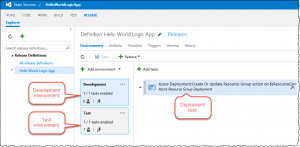
I configured the deployment to Development to happen automatically upon successful build (remember the build runs when I check-in the source code). But I wanted Test deployments to be manual.

I also created variables that enabled me to parameterize the name of the Resource Group, and the name of the Parameter File to use in each environment.
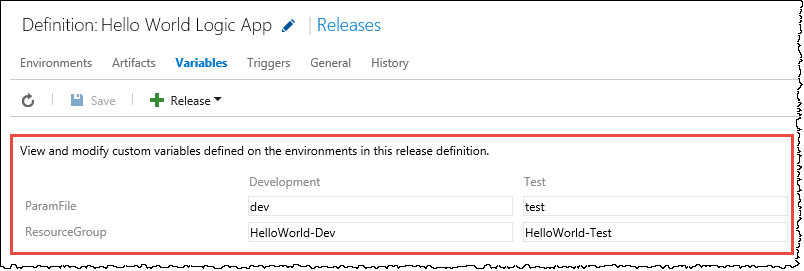
You can see here how I’m using those variables within the Azure Resource Group Deployment task.

But Does It Work?
Of course it works.
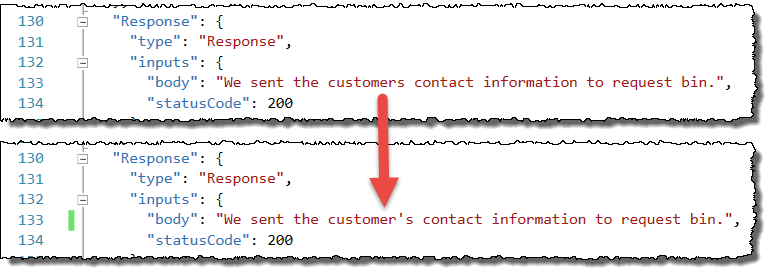
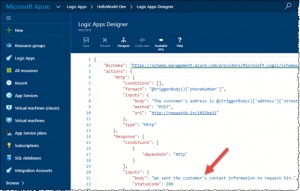
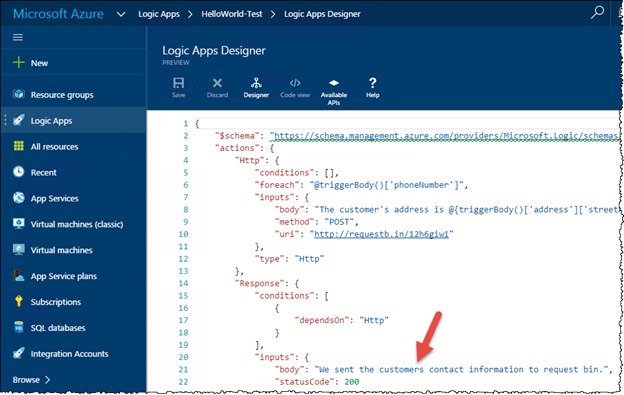
If I go to my Visual Studio project and modify something about my Logic App template. Maybe I finally get around to fixing that grammatical error in my response message.
Then I check-in my changes.
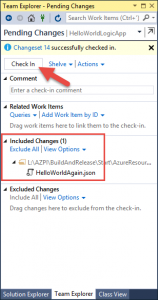
In VSTS, I can see that my build automatically started.
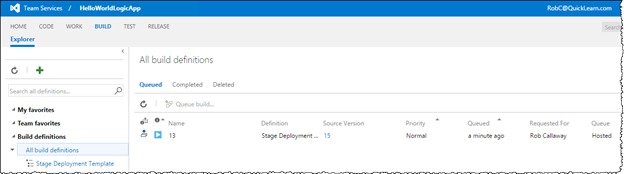
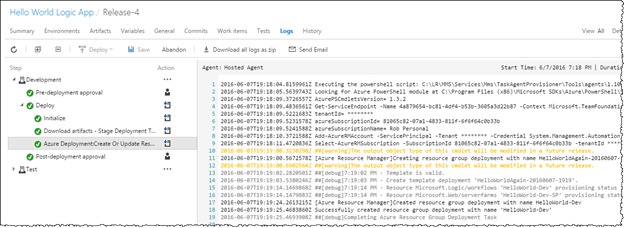
After the build completes, in the Release Hub I can see that a new release (Release-4) using the latest build (13) has started deploying to the Development environment.

I’ve got logs to show me what happened during the deployment.
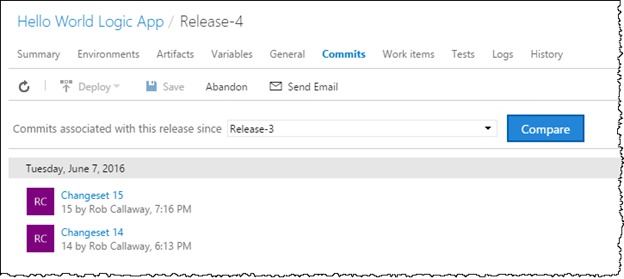
I can see the commits or changesets included in this release compared to earlier releases. So a month from now Nick can see what modifications were deployed in Release-4.
What’s going on in Azure though? It looks like the Logic App in the Development Resource Group was updated to match my changes.
But my Test environment wasn’t touched.
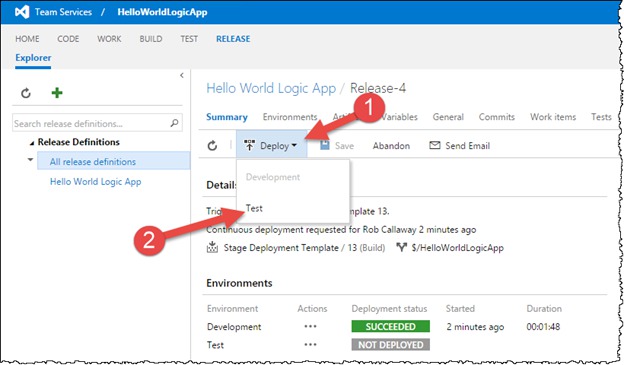
Over on the Release Hub, I can manually start the Deployment to Test.
I almost forgot, deploying to Test requires an approval as well.
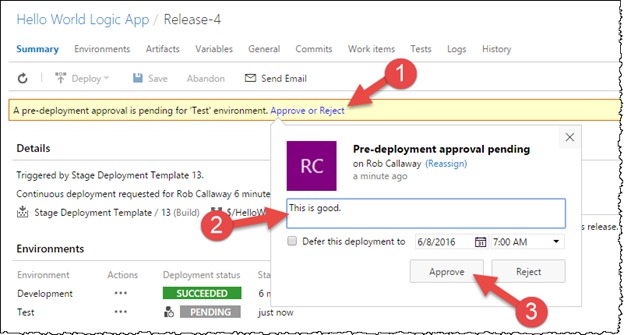
Just like that, it’s done.

What Does It Mean?
In about 30 minutes I was able to create a deployment pipeline for my Logic App. The deployment pipeline is flexible enough that changes can be made easily, but structured in a way that I (and everyone else on my team) can see exactly what it does.
Give Me More
QuickLearn Training offers courses to enhance your understanding of TFS / VSTS and Logic Apps. Our Build and Release Management Using TFS 2015 course has all the finer details that you’ll never get out of a blog article, and our Cloud-Based Integration Using Azure App Service course teaches you how to build enterprise-ready integration solutions using features of the Azure cloud.
