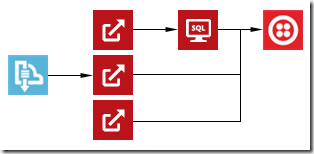
Earlier this week, I was revisiting a design for a Logic App that interacted with an event about a business entity that was represented as an XML message. It used data from this XML message to invoke actions later in the process, and relied on the XPath Extractor API App to provide access to the data contained within the XML. It looked something like this:
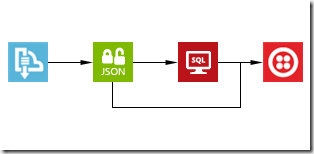
At the time, the choice to use XPath Extractor API Apps was an alright choice, given that there weren’t really any alternative API Apps in the marketplace that allowed one to cross the XML / JSON divide – JSON being the native tongue of Logic Apps. That has since changed, and upon revisiting the design, it became apparent that using the XPath Extractor was a poor choice.
I wasn’t doing anything complex (e.g., selecting the text inside an element only when that element had an attribute with a specific value and appeared nested inside an element beginning with a certain set of characters), I was just trying to retrieve the values stored within scalar elements within the same location in the XML document each time – elements that I would have simply treated as distinguished fields in BizTalk Server and happily dotted into while editing an expression.
Despite not doing something complex, the original design was using 3 separate API App executions just to read 3 separate values. That seems a little bit wasteful for something that the Logic App runtime would give me for free with JSON data.
Using the Right Tool to Bridge the XML / JSON Divide
So what API App was added into the mix since the original plan for this Logic App? The BizTalk JSON Encoder API App – which provides translation from/to XML/JSON.
It accomplishes this in a similar way to BizTalk Server’s own JSON Encoder / JSON Decoder pipeline components, and like those components also requires an XML schema in order to perform the conversion from JSON to XML. The schema can be written by hand, generated from JSON in the Azure Portal, generated from a Flat-file in the Azure Portal, or created using Visual Studio 2012 with the MABS SDK.
Once you have your schema, you can use the Components tile of the JSONEncoder API App within the Azure Portal to access an interface to upload and provide a name for the schema.
In the case of XML to JSON, the conversion can occur with or without a schema (i.e., a schema isn’t going to be used, but it won’t hurt anything if you upload one either).
Doing Simple Things with Simple Data
So how do we do something simple (e.g., access a few fields) with simple data? Thankfully, the answer is quite easily. First off, you will need to create an instance of the BizTalk JSON Encoder API App. This instance can be re-used for any XML to JSON conversions that you will require. Converting back to XML from JSON assumes that you have created the requisite schemas and uploaded them for the instance. One downside here is that you cannot share schemas between instances (as they are stored in local storage for the API App on the Gateway).
Once you have the API App, you can feed it any arbitrary XML payload and it will provide a nice JSON representation that you can dot into for any later actions in a Logic App. Unfortunately, its flexibility comes at the cost of rich metadata describing the shape of the output (i.e., the designer won’t be able to help you know which nodes will actually exist in the output, regardless of potentially having a schema available).
So let’s make it happen. I have an event about a business entity (product) that looks something like this as XML:
Let’s say that I want to retrieve the ProductName out of this message. In that case, the expression within a Logic App to retrieve the value would look something like this:
@body(‘jsonencoder’).OutputJSON.ProductEvent.ProductName
If the Remove Outer Envelope property on the BizTalk JSON Encoder API App was set to true, then it would look like this instead:
@body(‘jsonencoder’).OutputJSON.ProductName
As shown in the screenshot above, neither of these expressions are going to show up within my nice little drop-down list of values to select. Instead, I must dot into it in trust that it will be there. But how can we be a little bit more sure? We could couple it with an XML Validator, or add a condition on the action based on the logical existence of the node.
Does the simple case work though? Well, after updating the expression:
And then submitting the sample message to the source queue, this was the input/output set of the BizTalk JSON Encoder:
And this was the data that showed up in the request bin:
What If I Have More Complex Data?
What if the data that I have isn’t just a bunch of text in elements, but I have a complex structure with repeating nodes and attribute values? To find out, I loaded up the sample message with some sample data to see.
Running that through the JSON Encoder, I saw this output:
Attributes are represented as properties prefixed with @ and the text included in a node is represented as the value of a property named #text. Repeating nodes are collapsed into an array sharing the name of the node name – perfect for repeating an action against.![]()
Then, When Is the XPath Extractor the Right Answer?
Simple data or complex data might not be the determining factor in the choice between using the XPath Extractor or JSON Encoder API Apps to access data locked up in an XML message. Instead, it looks like the determining factor is how hard it is to describe where that data lives (or doesn’t live) within the content. In all the cases we’ve seen thus far, we referenced by name / location in the document. XPath will shine when we don’t have that information, or when we want information about the content in the document, and as such still deserves a place in the toolbox.
However, just because you’re trying to get data out of XML, and all previous knowledge points to XPath as the answer, it might not be – instead, the answer might be to translate that message into the native tongue of the runtime that’s interacting with it.
What’s Next?
I currently owe all of you readers out there a post about push triggers. I have most of it written, but I’m not yet fully pleased with it. I’ll try to get that out as soon as possible. Additionally, there’s another post that I’m even more excited about, one that I’ve been thinking about for the last 3 years. I’m likely going to be posting that one shortly after WPC.
Stay tuned. There’s heaps that I want to share, but, alas, the constraints of the solar day and the capacity of my human flesh prevent it from happening all at once.


